5. Tutorials
5.1. 99 Bottles of Beer - Or: How to create a simple state machine containing a loop
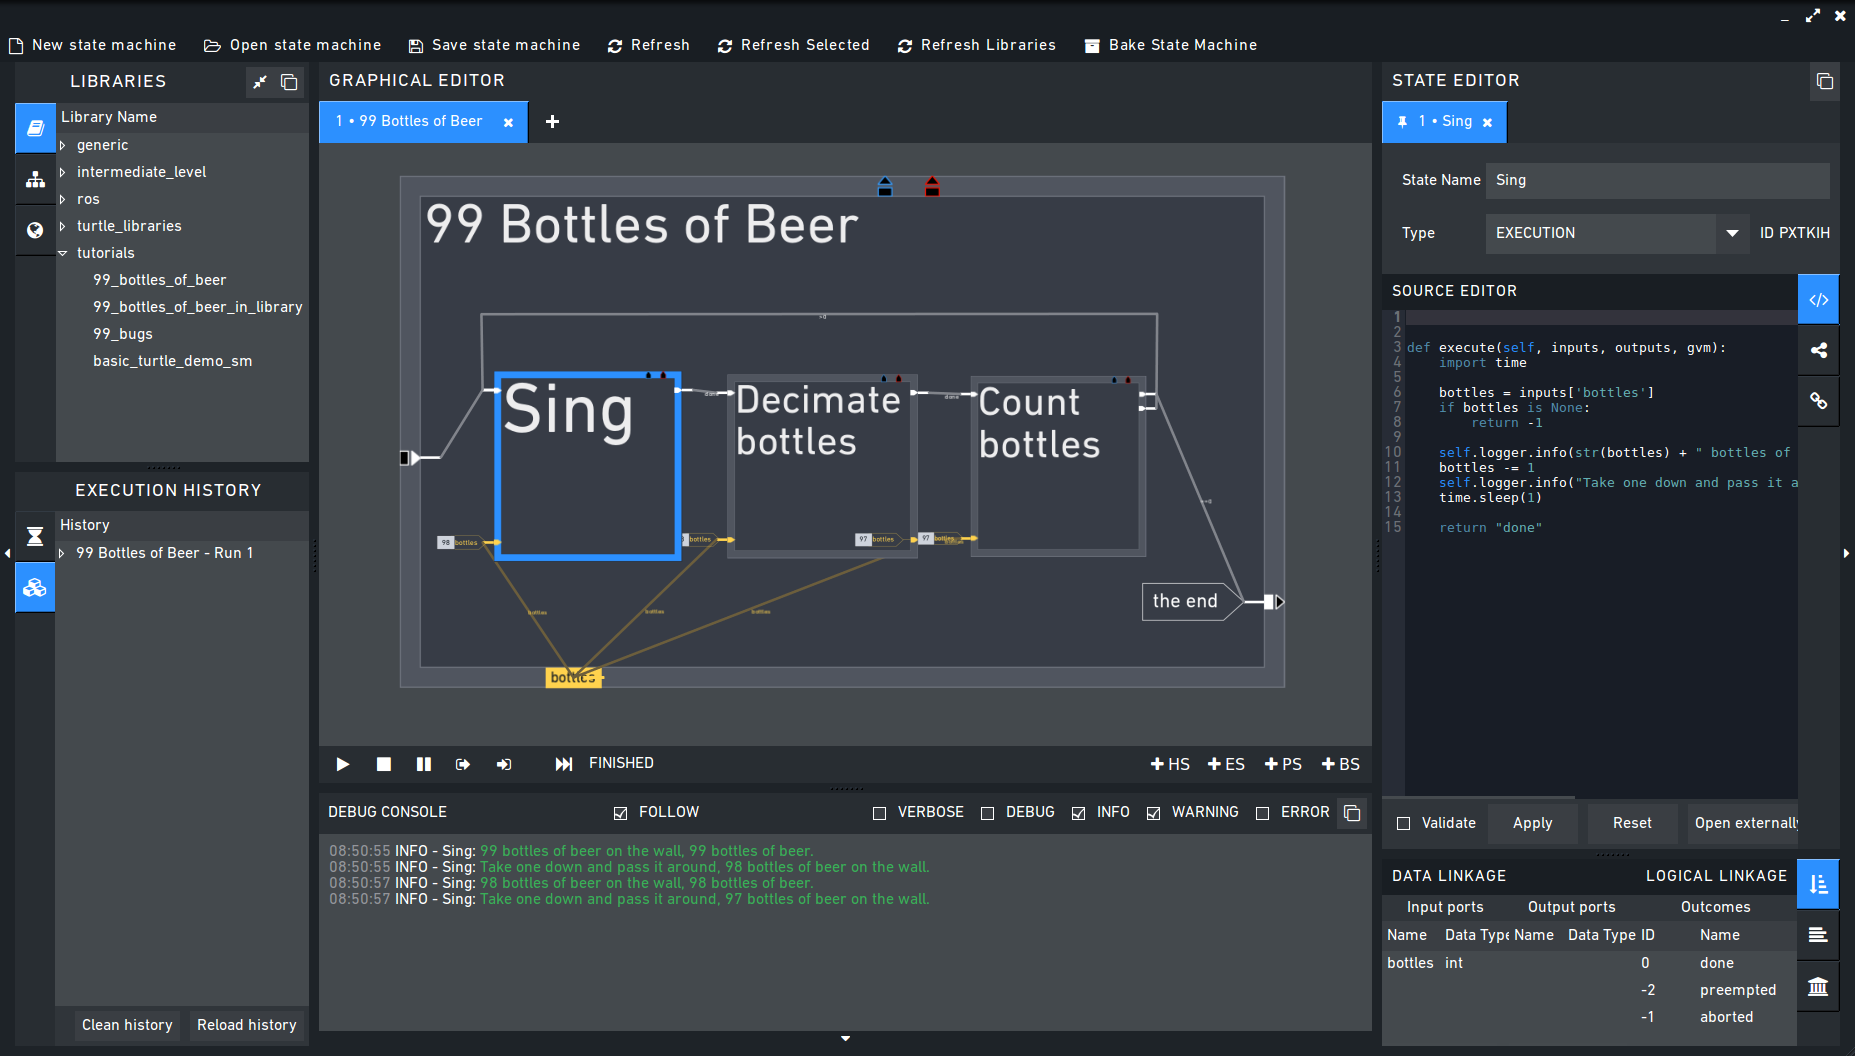
In this tutorial we create a simple state-machine printing the lyrics of “99 Bottles of Beer”, a slightly advanced version of a Hello World program. The purpose is to give a first impression of how to create programs with RAFCON, how to create loops and illustrate different ways of achieving things in RAFCON.
Start with a new state machine (first button in the tool bar or File => New in the menu bar). A new tab opens with the root container state named “new_root_state”.
Select the root state by clicking on it in the graphical editor (big center widget) or by opening the “State Tree” widget (left hand side) and clicking on the state here.
Now we change the name of the root state to “99 Bottles of Beer” by entering that text in the input field next to “State Name” in the State Editor on the right bar. Here you can also see all other properties of our container state.
Now we are going to create three execution states named “Sing”, “Decimate bottles” and “Count bottles”. Do so by selecting the container state first and then either use Alt+E or Edit > Add state in the menu bar. Rename each new state as described in the previous step.
You can use drag and drop for the three child states to place them next to each other. Using the lower center corner of all states, you can resize them. When holding Ctrl during the resize, the state keeps its width to height ratio. When holding Ctrl during the resize (of container states), all content is resized with the state.
Next, we are going to add the logical flow, that is the outcomes and transitions. “Sing” and “Decimate bottles” each need one outcome, which should exist by default. For “Count bottles”, we need two outcomes, the first (ID 0) is named “==0”, the second (ID 1) is named “>0”. Click on the state to open it in the State Editor and open the “Logical Linkage” widget on the bottom. In the upper half of this widget, you can edit the state’s outcomes. Create an additional outcome by clicking on “Add” or using Ctrl+A if the outcomes list has the focus. Then name the new outcomes (by clicking on the name in the name column). Also the container state needs an outcome, name it “the end”.
To finish the logical flow, we set up all transitions and start states. “Sing” is the start state of our only container (the root). Thus click on it and check “is start state” in the top of the State Editor. This creates a transition from the entry point of the root to the entry point of “Sing”. The easiest way to create the remaining transitions is to first left click on an outcome and, while holding the left mouse pressed, dragging the mouse over the income of the target state and release the mouse button there. This creates a transition starting from the outcome and going to the entry point of the state. The starting transition can be created in the same manner. Also waypoints for transitions can be created. In the default GUI (gaphas) waypoints can only be created after the transition has been created. Select any transition then click on the grey square and move it. Two new square emerge that can be modified accordingly. In the OpenGL GUI, you can set transition waypoints by clicking on the desired position within the container state while creating the transition. Later, you can add/remove waypoints by clicking on the desired position of the transition. By this, you can e. g. draw transitions around other states. Another possibility to create transitions is the State Editor again. In the lower half of the Logical Linkage widget, new transitions can be created by a click on “Add” (or using Ctrl+A if the focus is on the transition list). The widget tries to guess on which transition to create, but you can edit the origin and target with the dropdown list in the appropriate column. We need four transitions. One from “Sing” to “Decimate bottles”, then one from “Decimate bottles” to “Count bottles”, one from “Count bottles” outcome “>0” back to “Sing” and finally one from “Count bottles” outcome “==0” to “the end” of the container.
In this step we are going to create the data ports and scoped variables. For printing the verse, our “Sing” state needs the current number of bottles as input. Therefore we create an input data port. Select the “Sing” state and open the “Data Linkage” widget in the State Editor. The ports are handled in the upper half of this widget. First select the “Input Ports” tab and then create an input by clicking on the “New” button. Set the name to “bottles” and the type to “int”. We do not need a default value here (the default is automatically “None”). “Decimate bottles” needs an input and an output port to read in the current number of bottles and to return the new number of bottles. Thus, create the two ports, both named “bottles” and both of type “int” (again no default values). “Count bottles” also needs only an input port of type “int” and name “bottles”.
In order to hold data between the loop iterations, we need a scoped variable. This variable is defined in the container state. It is created analogous to inputs and outputs, just in the “Scoped Variables” tab. Name and type are again “bottles” and “int”. Here we set the default value, which is also the initial value, to 99. Scoped variables can be moved in the graphical editor just like states with drag and drop. To move the scoped variable the corresponding state has to be selected and Ctrl pressed.
The data flows are now created similar to the transitions. Either in the graphical editor by clicking on the origin port (from where to read) and then clicking on the target port (to where to write) or, alternatively the bottom half of the Data Linkage widget can be used. Create the following data flows:
From the scoped variable to the input of “Sing”: Here we are reading the current number of bottles
From the scoped variable to the input of “Decimate bottles”: Here we are reading the current number of bottles
From the output of “Decimate bottles” to the scoped variable: Here we are writing the decimated number of bottles back
From the output of “Decimate bottles” to the input of “Count bottles”: Here we directly pass the decimated number to “Count bottles”. This could also have the scoped variable as origin.
Finally, we have to add some source code to the three child states. The code executed for each state is shown in the source code widget of the State Editor. The method description is automatically created. You just have to insert your code after the line
def execute(...). Copy the code following at the end of the tutorial into the states. Important: You have to click on “Apply” to apply changes. Thesleepstatements in the code only serve illustrative purposes, better visualizing the flow of active states. You see that you can read from ports using the inputs dictionary (bottles = inputs['bottles']) and write to ports using the outputs dictionary (outputs['bottles'] = inputs['bottles'] - 1). You can also rename these dictionaries if you prefer a different (shorter) name:def execute(self, in, out, gvm):. The logger is a member of each state and can be used to write to the logger window. You can use different logger levels (debug, info, warn, error, verbose). Moreover, custom logger levels can be created in the logger config file (logging.conf in source/rafcon).You can now test the state machine. Click on Execution > Start and see what happens. The current state should be highlighted and the verses printed in the logger widget. You can stop the execution with Execution > Stop. Alternatively, use the buttons shown in the menu of the Graphical Editor.
# State "Sing"
def execute(self, inputs, outputs, gvm):
    import time

    bottles = inputs['bottles']
    if bottles is None:
        return -1

    self.logger.info(str(bottles) + " bottles of beer on the wall, " + str(bottles) + " bottles of beer.")
    bottles -= 1
    self.logger.info("Take one down and pass it around, " + str(bottles) + " bottles of beer on the wall.")
    time.sleep(1)

    return 0
# State "Decimate bottles"
def execute(self, inputs, outputs, gvm):
    import time

    outputs['bottles'] = inputs['bottles'] - 1
    time.sleep(0.2)

    return 0
# State "Count bottles"
def execute(self, inputs, outputs, gvm):
    import time

    time.sleep(0.2)

    if inputs['bottles'] > 0:
        return 1
    return 0
5.2. Using ROS2 with RAFCON
RAFCON already provides the tools to directly use ROS2 by running interface state machines. Here, we will give a quick overview how to perform simple service calls and subscribing or publishing from inside RAFCON.
Setup
As a prerequiste, ROS2 needs to be installed on your system (note that RAFCON is a ROS2 independent python library and therefore ROS2 needs to be installed manually).
The example state machines are tested with ‘Humble’ but all common distributions should work.
We created some helpful utilities that are located in the source code at source/rafcon/utils/ros2.
The example state machines shown in this tutorial will use these utilities.
Start RAFCON in ROS2 environment (to be able to
import rclpy).Once RAFCON is loaded, find the library state machine in
ros2/init_ros2_node. Open the state machine and run it. This state machine will create a ROS2 node that handles publishing, subscribing and service calls (basically all ROS2 traffic) happening via RAFCON. The node will be saved as a global variable (calledrafcon_ros_node) and can be used in any state machine via the GVM.Optionally: You can set a custom robot namespace for the ROS2 node in the input parameters. This is used for namespace scoping of topics and services. If you are unsure, you can just leave the input parameter empty.
Calling a service from RAFCON
Start a terminal separate from RAFCON with a ROS2 environment and host the add_two_ints_server-service by running:
ros2 run demo_nodes_py add_two_ints_serverUse the state machine
ros2/ros2_service_call_exampleto perform the service call of adding two integers. Note that the example state machine has several inputs (aandb) and an output (sum). The input parameters directly map to the service definition of the add_two_ints_server-service by type and name. The same applies for the output. An additional input portnamespacecan be used to prepend the service name with a string or left empty. You can inspect the code used to map the input parameters of the state machine to the request of the service call inside the state machine. There are some helpful explanations on how to use the parameters and how the service name is set.Once the state machine finishes, the output port
sumshould be filled with the result ofa+b.
Subscribing to a topic from RAFCON
Start a terminal separate from RAFCON with a ROS2 environment and start a publisher by running:
ros2 run demo_nodes_py talkerUse the state machine
ros2/ros2_subscribe_exampleto subscribe to the talker. The state machine comes with an additional input porttimeoutthat determines how long the state machine will wait for a message to arrive before returning. Similar to the service call example above, take a look at the code in the state machine to change parameters and topics.Once the state machine finishes, if a message was received on the
/chattertopic, the output portdatawill be filled with the message.
Publish on a topic from RAFCON
Start a terminal separate from RAFCON with a ROS2 environment and start a listener by running:
ros2 run demo_nodes_py listenerUse the state machine
ros2/ros2_publish_exampleto publish to the listener. Similar to the service call example above, the input parameterdatadirectly maps to the message field of the/chattertopic by name and type. Take a look at the code inside the state machine for further adaptation.The state machine will try to publish on the defined topic. If no subscriber is available, the state machine will still publish the message but also output an error.
Provide a service from RAFCON
Use the state machine
ros2/ros2_service_server_exampleto start a service server hosted from the RAFCON state machine.Start a terminal separate from RAFCON with a ROS2 environment and try to call the add_two_ints_server-service:
ros2 service call /add_two_ints example_interfaces/srv/AddTwoInts "{a: 2, b: 3}"Once the service is called a callback function will be triggered called
srv_callback. This function is defined in the code of the state machine. In this example, the callback function will just add the two integers send from the terminal.
Shutdown
When the ROS2 node is not needed anymore or you want to re-initialize it, execute the state machine ros2/shutdown_ros2.
This will destroy the node and delte the global variables.
For further development, also take a look at the utility scripts provided in source/rafcon/utils/ros2.
There are some helpful tools and functions that can be used in the state machines as well.
5.3. How to create and re-use a library state machine
State machines can easily be reused in form of library states. All you have to do for this is telling RAFCON the path to your state machine and give this path a name.
Option 1
This can be done in the Core Configuration.
Let’s add a new library path to our config file, which by default looks like this:
TYPE: SM_CONFIG
LIBRARY_PATHS:
    generic: ${RAFCON_LIB_PATH}/generic
USE_JSON: true
We edit the LIBRARY_PATH to take into account the library with name
“lib_tutorial” located at ~/Desktop/rafcon_tutorial_library:
TYPE: SM_CONFIG
LIBRARY_PATHS:
    generic: ${RAFCON_LIB_PATH}/generic
    lib_tutorial: ~/Desktop/rafcon_tutorial_library
USE_JSON: true
RAFCON assumes the path to be existing, so make sure it is. Otherwise RAFCON will print a warning message.
On the left side in the Library Tree, you can now see the new entry lib_tutorial,
which is currently empty.
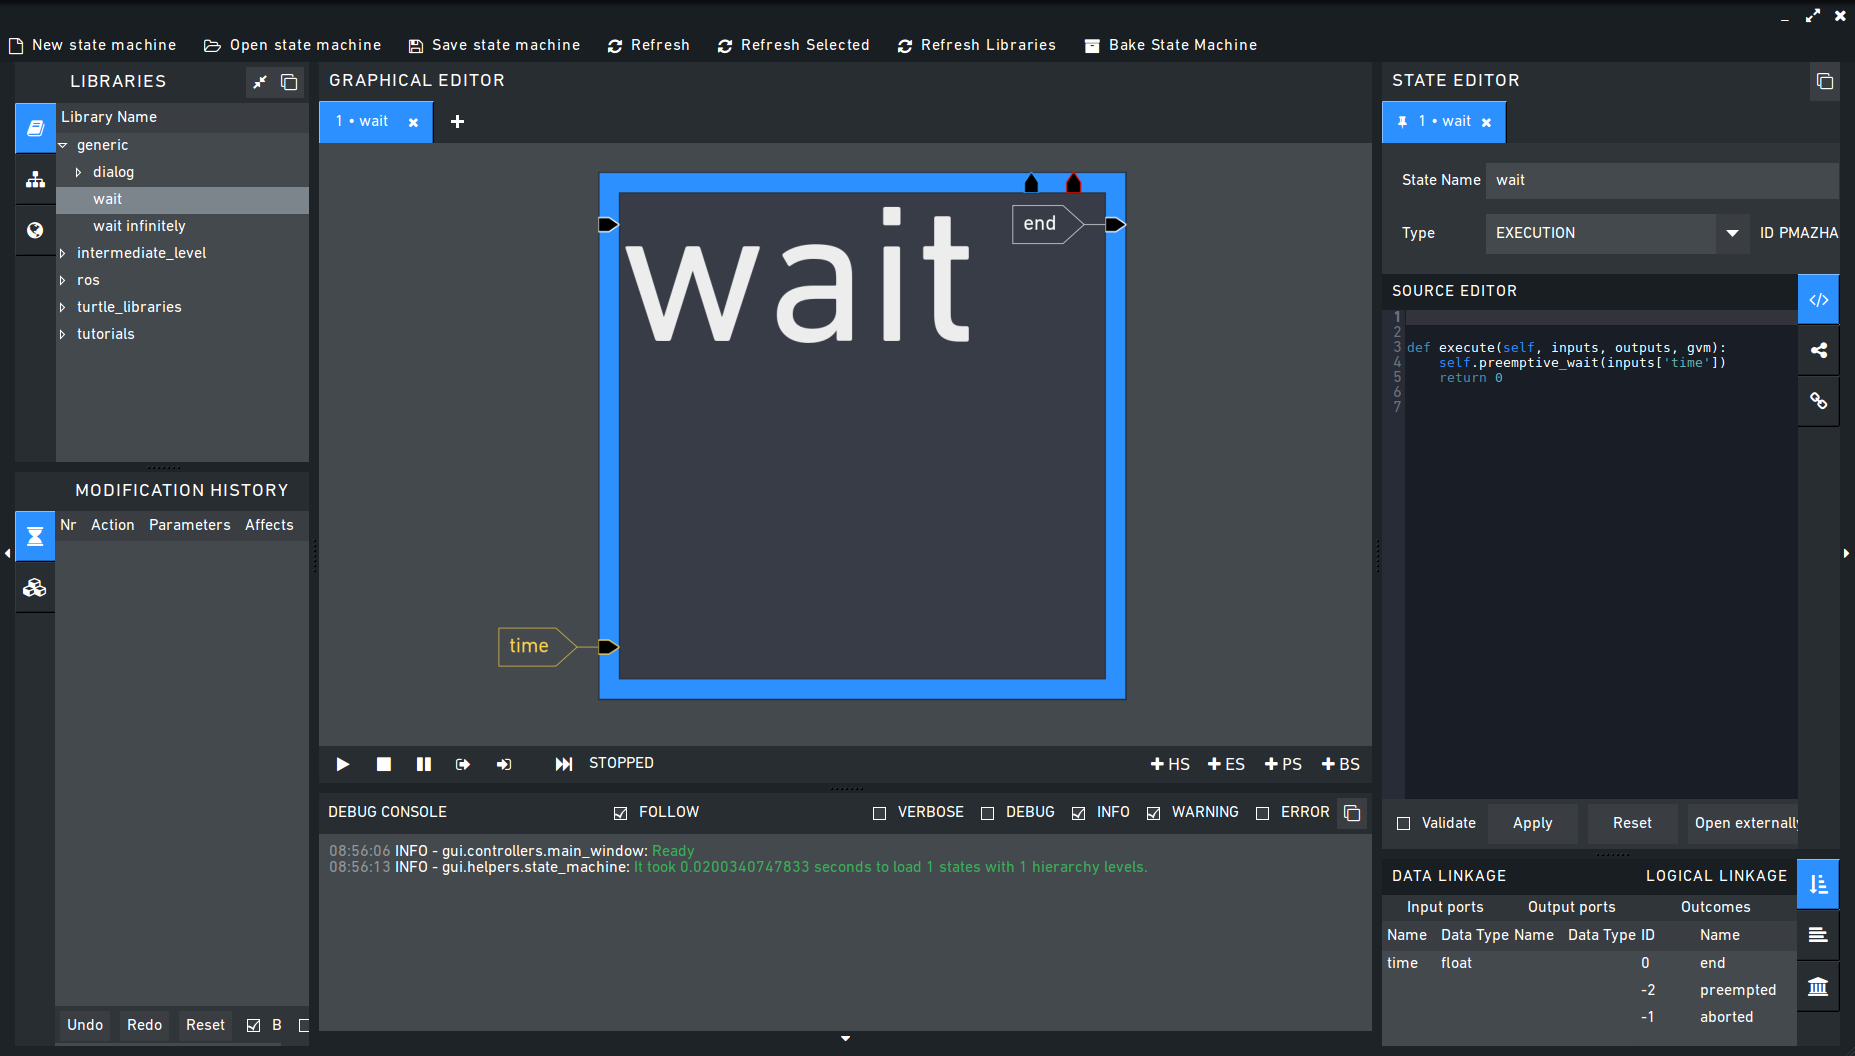
Next, we generate two state machines, one is waiting and another is printing a message to the logger console (info level). Generate two state machines by clicking the button “New state machine” and turn the root_state to a ExecutionState (by using StateEditorWidget on the center site and select “Execution” as type instead of “Hierarchy”) and insert the following scripts.
First:
import time

def execute(self, inputs, outputs, gvm):
    time = inputs['time']
    if self.preemptive_wait(time):
        return 'preempted'
    return 0  # same as return "success"
Second:
def execute(self, inputs, outputs, gvm):
    message_to_print = inputs['info_message']
    self.logger.info(message_to_print)
    return 0
Don’t forget to create the input data ports used in the scripts (‘time’ as float and ‘info_message’ as string) and run them finally to test there functionality.
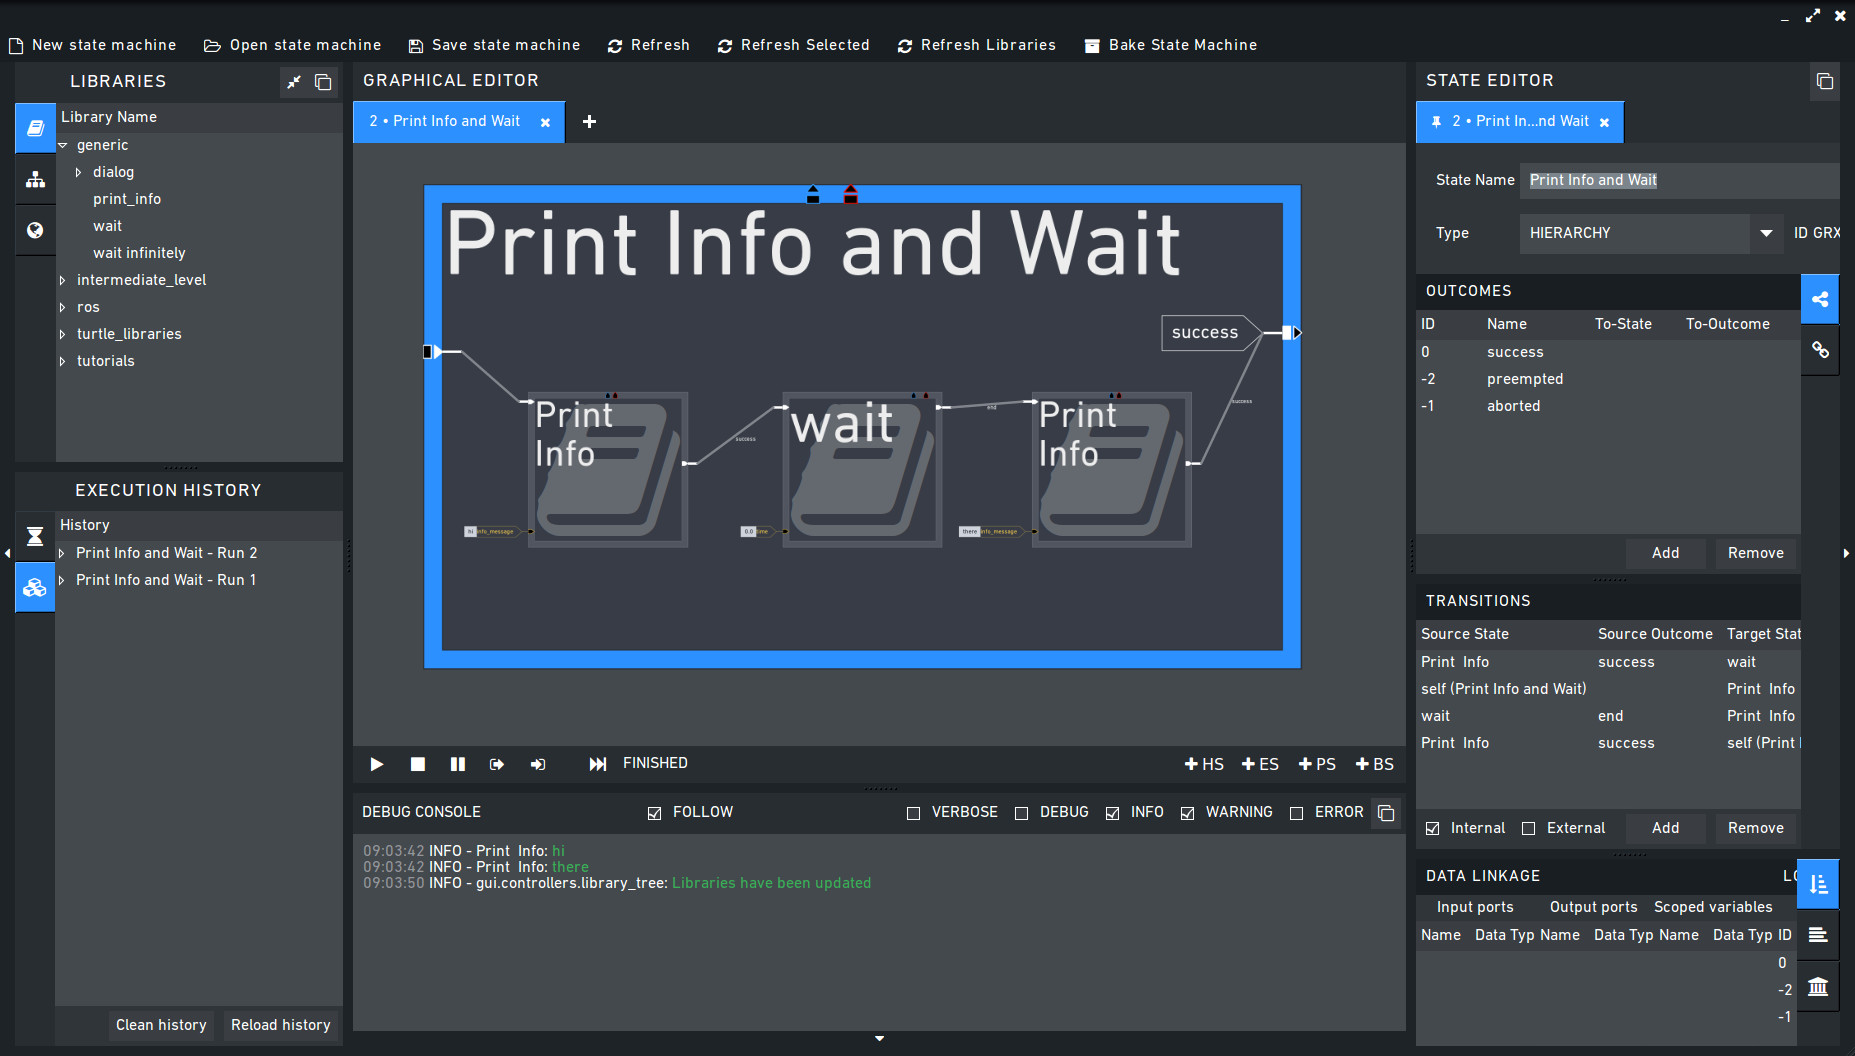
Screenshot of the finished library tutorial
Give the state machines useful names like “Wait” for the first and “Print Info” for the second state machine.
Store both state machines (by pressing button “Save state machine” or
Ctrl+s) to sub-folders of ~/Desktop/rafcon_tutorial_library by
entering a the library folder and assigning a name in the dialog window.
The name is used to generate the new library state machine path.
Now press the button “Refresh Libraries”. The new libraries will be now available in the library tree. They can be used to create more complex state machines.
Using Drag&Drop, the created library state machines can be re-combined as in the “Screenshot of the finished library tutorial” and the input port values can be modified to generate similar console info prints while running the state machine.
Option 2
Instead of specifying the path of the library in the config file, there is an alternative solution.
You can also set the environment variable RAFCON_LIBRARY_PATH being a colon-separated list of paths to state machines,
e.g. ~/path/to/your/rafcon_tutorial_library1:~/path/to/your/rafcon_tutorial_library2.
These libraries will also be loaded.
The name of the mounted library root keys is equivalent to name of the last folder of each path.
In our case this would be rafcon_tutorial_library1 and rafcon_tutorial_library2.
This approach is especially useful if you use RAFCON in combination with a package management system such as conan (https://conan.io/) or a local pip server.
5.4. How to use concurrency barrier states
In the following a short example on how to create a barrier concurrency state is explained.
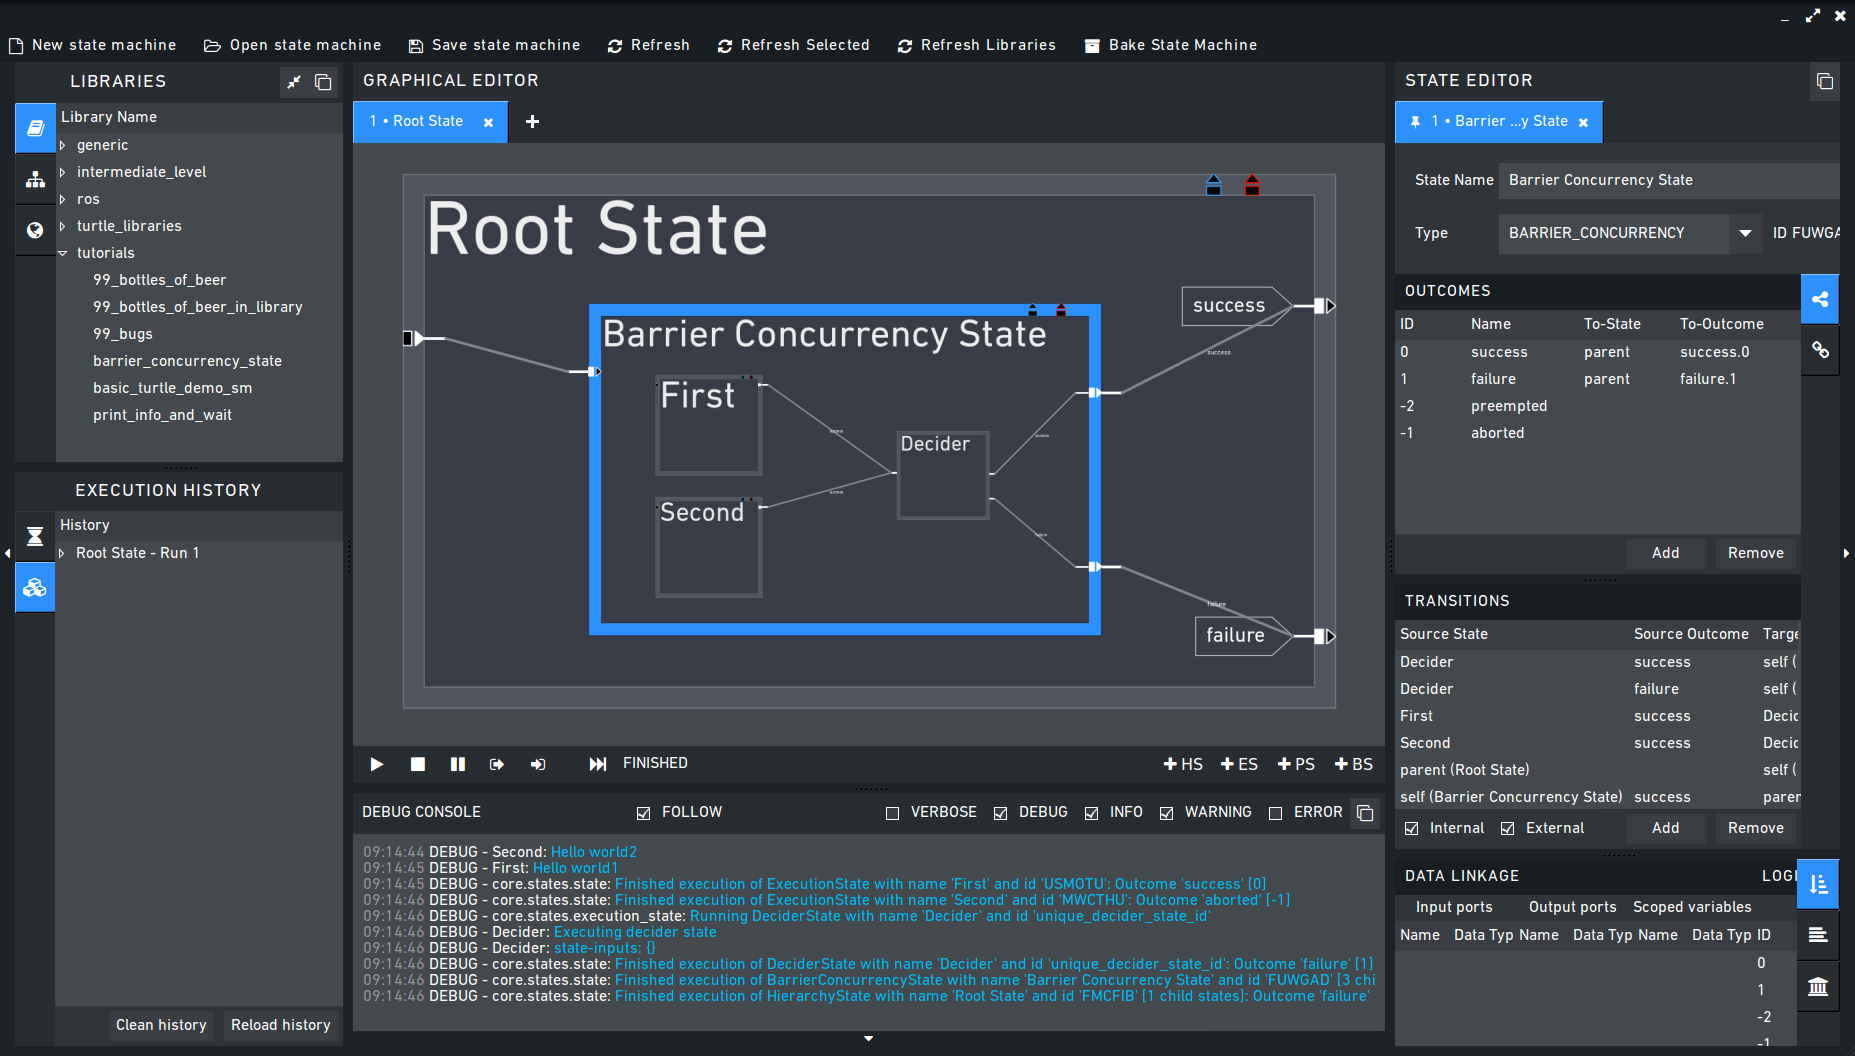
At first create the state and transition structure shown in the above image. The State called “Barrier Concurrency” is a barrier concurrency state. The state called decider is the state that is automatically created when a new barrier concurrency state is added. The decider state gets the information of all concurrent child states about the chosen outcome, the output data and even every eventually occurred error. Of course data flows can also arbitrarily be connected to the decider state from each concurrent child state. With this information it can decide via which outcome the barrier concurrency state is left.
To get some output paste the following source lines into the appropriate states:
First:
import time

def execute(self, inputs, outputs, gvm):
    time.sleep(1.0)
    self.logger.debug("Hello world1")
    return 0
Second:
import time

def execute(self, inputs, outputs, gvm):
    self.logger.debug("Hello world2")
    time.sleep(2.0)
    number = 1/0 # create an error here that can be handled in the decider state
    return 0
Decider:
from exceptions import ZeroDivisionError

def execute(self, inputs, outputs, gvm):
    self.logger.debug("Executing decider state")
    self.logger.debug("state-inputs: {0}".format(str(inputs)))
    # to make decisions based on the outcome of the concurrent child states use:
    # "self.get_outcome_for_state_name(<name_of_state>) for accessing the outcome by specifying the name (not necessarily unique, first match is used) of the state
    # or self.get_outcome_for_state_id(<id_of_state>) for accessing the outcome by specifying the id (unique) of the state
    # example:
    # if self.get_outcome_for_state_name("Second").name == "success":
    #     return 0
    # here the error of the state "Second" is used to make a decision
    if isinstance(self.get_errors_for_state_name("Second"), ZeroDivisionError):
        return 1
    else:
        return 0
5.5. Starting a minimal RAFCON core (RAFCON API)
This tutorial will show how to set up a minimal RAFCON core and use RAFCON API functionality to run state machines.
The following script gives an overview of a basic setup. By saving it in a .py file, it can simply be executed afterwards.
Note that the path to the config.yaml has to be set correctly. By default, it should be under the .config directory, as specified below.
Similarly, the path_to_state_machine must point to an already existing state machine. In the example below it will execute the “99 Bottles of Beer”.
#!/usr/bin/env python3

import time

import rafcon.core.singleton as rafcon_singletons
import rafcon.core.start as rafcon_start

from rafcon.core.config import global_config as rafcon_global_config
from rafcon.core.execution.execution_status import StateMachineExecutionStatus as ExecutionStatus
from rafcon.core.state_machine import StateMachine
from rafcon.core.storage import storage as rafcon_storage

def main():
    print("Initialize RAFCON ... ")
    rafcon_start.pre_setup_plugins()
    rafcon_start.setup_environment()
    rafcon_start.setup_configuration("/home/user/.config/rafcon/config.yaml")
    rafcon_global_config.set_config_value("FILE_SYSTEM_EXECUTION_HISTORY_ENABLE", True)

    print("Set and load state machine ... ")
    path_to_state_machine = '/home/user/rafcon/source/rafcon/share/rafcon/examples/tutorials/99_bottles_of_beer/statemachine.json'
    print(f"Start loading the statemachine: {path_to_state_machine}")
    start_time = time.time()
    state_machine = rafcon_storage.load_state_machine_from_path(path_to_state_machine)
    stop_time = time.time()
    diff = stop_time - start_time
    print(f"Duration of loading: {diff}")

    print("Set global variables ... ")
    gvm = rafcon_singletons.global_variable_manager
    gvm.set_variable(key='test_var', value=42)

    print("Activate and start state machines")
    execution_engine = rafcon_singletons.state_machine_execution_engine
    state_machine_manager = rafcon_singletons.state_machine_manager
    sm_id = state_machine_manager.add_state_machine(state_machine)
    state_machine_manager.active_state_machine_id = sm_id

    execution_engine.start()

if __name__ == "__main__":
    main()
More information on how to use the API can further on be found under RAFCON API: The rafcon package.
5.6. Using the monitoring plugin
The tutorial is only for internal use inside the institute.
This tutorial will show how to use the monitoring plugin i.e. how to monitor one system from another one if both are using RAFCON as their flow control solution. First, we need to setup our environment:
rmpm_do env rafcon_monitoring_plugin > /tmp/rafcon_monitoring_plugin.env
source /tmp/rafcon_monitoring_plugin.env
By running RAFCON after sourcing the environment, the
network_config.yaml is automatically generated in our home folder:
~/.config/rafcon/ if it does not already exist. This file contains
all settings for the communication. More details can be found at the
Configuration. The path of the
network_config.yaml can be changed by running the start.py
script with argument “-nc”, which will be necessary when we want to
connect server and client running on a single system like in this
tutorial. Therefore we create the subdirectories /client and
/server within the ~/.config/rafcon/ path and copy/paste the
network_config.yaml into both. Since the file is created for servers
by default, we just have to edit the one in the /client directory,
where we replace the <SERVER: true> column by <SERVER: false>.
Now we can launch the server:
rafcon -nc ~/.config/rafcon/server
and the client:
rafcon -nc ~/.config/rafcon/client
If everything went fine, we should see below output in the debug console of the client:
11:23:40 INFO - monitoring.client: Connect to server ('127.0.0.1', 9999)!
11:23:40 INFO - monitoring.client: self.connector <monitoring.client.MonitoringClient on 59055>
11:23:40 INFO - monitoring.client: sending protocol 34ce956f:72f0dc:2:4:Registering
11:23:40 INFO - monitoring.client: Connected to server!
After the connection was established, we open the same state machine on server and client.
Now we are able to remote control the server by the client.
To connect two systems distributed across a network, the <SERVER_IP:> has to
be adjusted within the network_config.yaml files.
5.7. How to use dialog states from the generic library
Sometimes it can be useful to await user confirmation before jumping into a state or request a text input from the user. That is why RAFCON contains several dialog states in its ‘generic’ library. This tutorial goes through several of them and explains their characteristics.
MessageDialog
This dialog prompts the user with a text which is defined by the string type input dataport ‘message_text’. The boolean type input dataport ‘abort_on_quit’ defines the states behaviour on canceling the dialog. If True, the state will return with the ‘abortion’ outcome, otherwise it just will return with ‘success’.
InputDialog
This dialog contains two buttons like the 2ButtonDialog but also features a ‘message_text’ entry field and an optional ‘checkbox_text’ entry field, which could be used for a ‘remember’ option or something similar. The checkbox is only placed if a string is present for the ‘checkbox_text’ input dataport. The checkbox state is written to the boolean output dataport ‘checkbox_state’, the entered text to ‘entered_text’.
ColumnCheckboxDialog
This dialog contains buttons like the 2ButtonDialog but also features a single column of checkboxes with labels attached to them. These labels are defined via the ‘checkbox_texts’ input dataport as a list of strings. The states of those checkboxes are emitted as a bool list via the ‘checkbox_states’ output data port. A checked checkbox returns ‘True’.